Building a Pull Request bot with Azure Functions - Part 1 - Introduction
- 6 minutes read - 1138 wordsAbout 2,5 years ago I was talking to my fellow team members about some of their challenges. At the time we had recently switched from TFS Version Control (TFVC) to Git, which obviously introduced quite a few changes in the way we worked. For example, we introduced pull requests as a mandatory step in the development flow in order to increase awareness and code quality. However, we found that some things that would need to happen for every pull request weren’t being done (or not done properly) which weren’t always caught by reviewers either. This usually caused delays and rework later on in the development process.
So I suggested to do some automation around these things, since they were laborious and dull which made them an ideal candidate for automation. And there the idea of a pull request bot was born. I wanted to develop something that could be easily extended to perform whatever automated checks we could think of and then post comments in the pull request to trigger developers. So I set out to build just that.
This is the first post in a series and I figured it would be a great story to tell as part of the Applied Cloud Stories initiative.
A first try
For my first try I had a couple of constraints and challenges that I needed to tackle:
- Cloud was a bit of a no-go for us at the time, so it had to run on-premises
- I didn’t want to flood the developers with a sea of comments, so I needed to keep some state as to what comments had already been posted
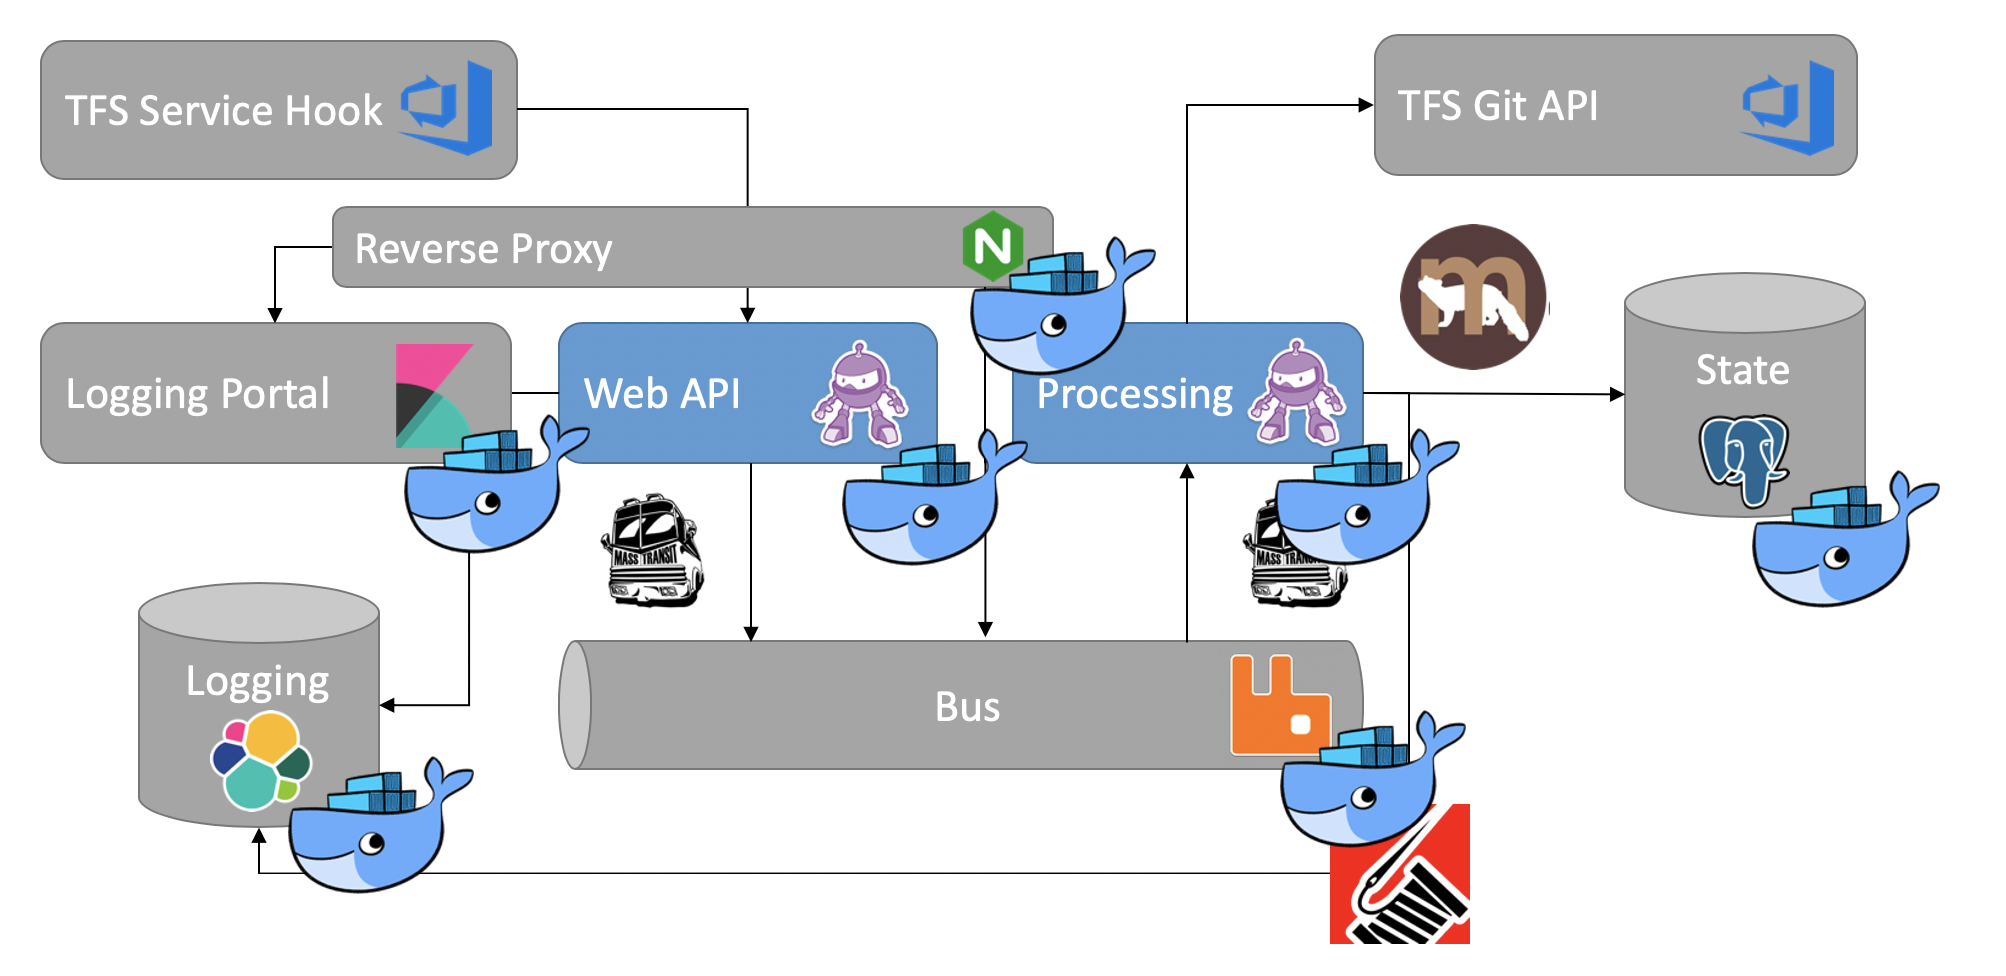
I initially approached this as a hobby project of sorts, so I figured it was a good time to try out some new technology for this project. .NET Core 2.0 just came out back then and Docker was all the rage, so I went with that. To avoid locking up our TFS server I figured it might be good to introduce some queuing, so I picked MassTransit and RabbitMQ to solve that bit. For keeping the state of what comments had already been posted I ended up using Marten to turn PostgreSQL into a document database. And of course I needed to do some logging as well, so I used Serilog to write semantic logs to Elastic Stack.

Initial architecture
If you’re reading this and thinking “Wow, that is quite complex”, you are absolutely right. In fact, that was exactly the feedback I got from some of my co-workers when I presented the slide shown above at an internal talk. Most of my co-workers were used to developing .NET Framework applications running on IIS on Windows Server, so this was quite a departure from that.
But the good news was that it was working and it was working well. From a usage perspective it did much of what I had initially hoped to deliver so I was quite happy with it. Maintaining it was mostly down to me though and due to the complexity it wasn’t easy for my co-workers to help me with that. Fortunately things were about to change.
Looking at the cloud
About a year later we made the decision to migrate our on-premises TFS onto Azure DevOps hosted in the cloud. This also meant that the pull request bot had to move along with it to the cloud, so this was an ideal opportunity to rethink its design. Even for my initial design I considered using Azure Functions to build it but decided against it due to the constraint of needing to run on-premises. Now that I didn’t have that constraint anymore I figured it could very well be a great solution, while simultaneously simplifying the whole thing.
So I set out to basically re-implement the pull request bot using Azure Functions, but I had one challenge: how am I going to handle state. Azure Functions are stateless by design and for a good reason, but I still didn’t want to flood our developers with comments. Fortunately the Azure Functions team thought about that so they introduced Azure Durable Functions. This is essentially an extension to Azure Functions that allows you to build sort of a workflow composed out of regular Azure Functions that do the actual work. What’s nice here is that it stores state in between those calls. After attending a talk by Kees Schollaart on Durable Functions I was convinced it would be a good solution to my state problem.
Migrating to the cloud
Of course, our migration from TFS to Azure DevOps wasn’t going to be done in a day. Unfortunately that also meant we couldn’t move our pull request bot to the cloud just yet since it was receiving web hooks from our on-premises TFS server and then calling back into that TFS server as well, which just wouldn’t work from a networking perspective. But I also didn’t want to postpone building the new pull request bot based on Azure Functions until we had actually migrated to Azure DevOps.
Luckily for me the Azure Functions runtime also comes packaged as a Docker container. This allows you to run Azure Functions on your own infrastructure. Of course that doesn’t give you the ability to scale up and down on demand as needed like in Azure, but at least it gave me the possibility to do the migration and properly test it before moving it to Azure. Since this wasn’t super critical I wasn’t worried about the scaling either. If the analysis done by the bot would take a little bit longer I could live with that.
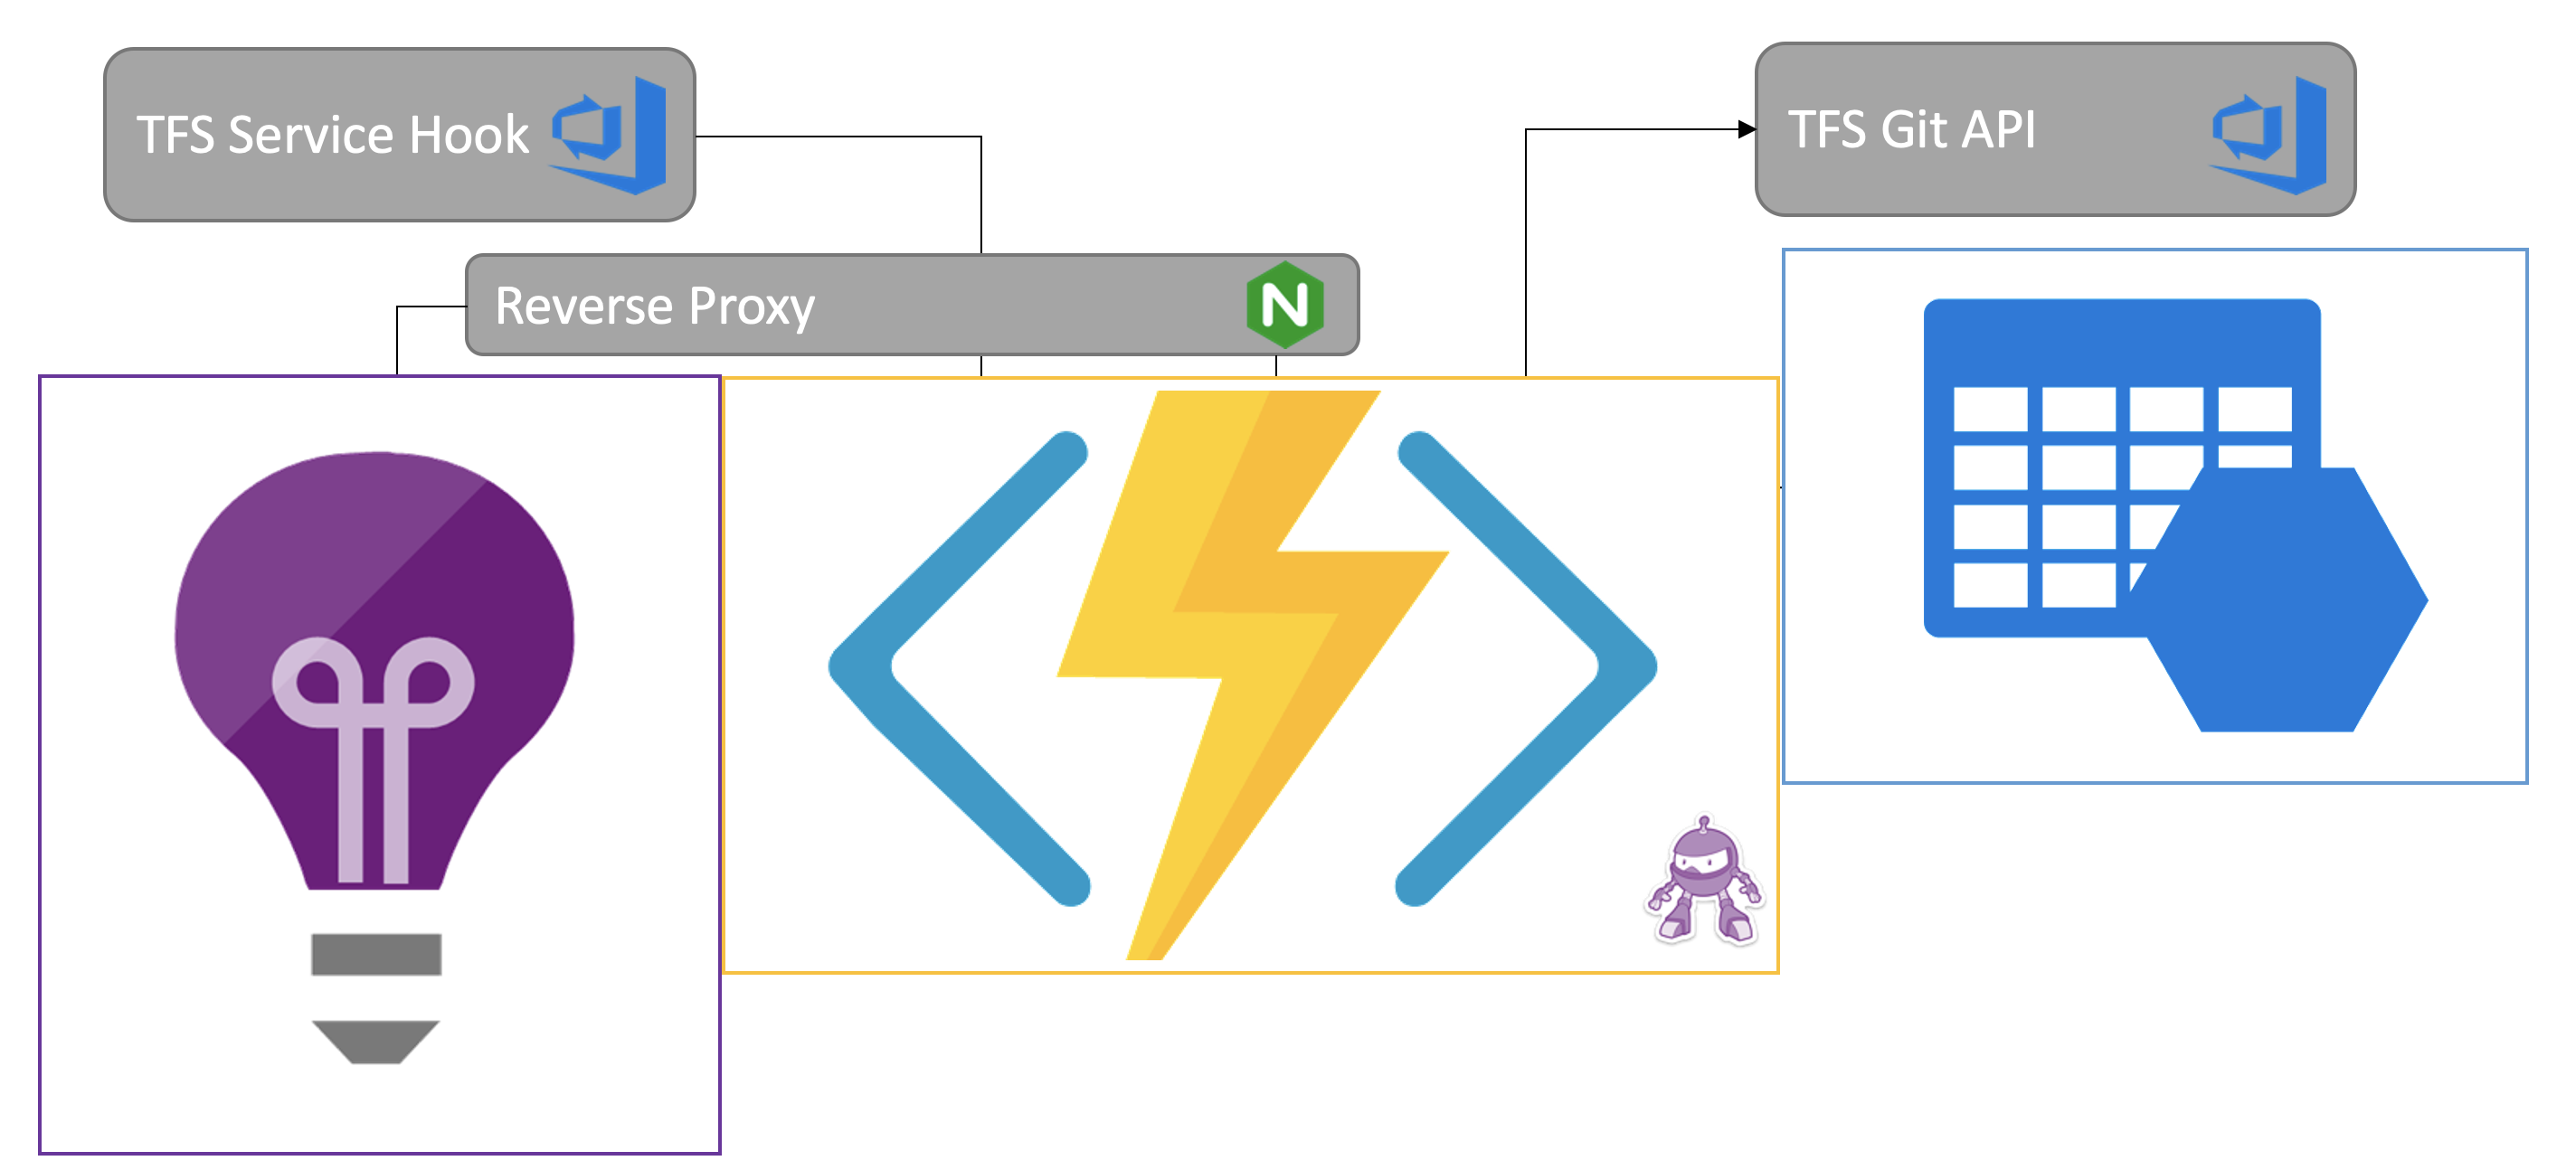
State still needed to be persisted though and Durable Functions uses an Azure Storage Account for that. But I had no problem with the storage being up in Azure already, while the logic ran on-premises. In fact, this made it even easier to move the logic to Azure later on without having to migrate the storage. I had also replaced the logging based on Elastic Stack with Azure Application Insights, so I also created that up in Azure and connected the Docker container to it. And before I knew it it was all working and running
Conclusion
Honestly I was quite surprised how easy it was to move my existing code into Azure Functions. What helped was that when I initially build it I already made a clear separation between the WebAPI and queue handling and the core logic of the bot. Most of the core logic could be re-used as is in Azure Functions without much changes. And the overall solution became a lot simpler as you can see:

In my next post I will dive into the inner workings of the bot to explain in detail how it works.